Let's Talk About Gear
Sep 23, 2025
Before we get started, I feel compelled to share a disclaimer: Start now. Invest in gear later. This is a sensitive topic, because some will tell you that you absolutely must have this brand, that lens, those lights, these filters, diffusers, microphones, jeans, car, house, jet, mega-yacht, and the list goes on. I want to make a very clear distinction here. Some gear is better than other gear, yes. BUT. Any gear is better than no gear, and frankly, if you have a smartphone, you can make a high-quality video that will compete with most of the content online, and I will continue to build resources that will help you do just that.
All that to say, I will be speaking to those who have moved beyond the iPhone today (don’t worry, my friend, I’ll come back to you another time!). More specifically, I will be unpacking everything you need to film a professional talking-head style video, much like what you see on YouTube and throughout corporate America. This video style has a broad use-case and continues to serve up impactful content. It’s also one of the simplest styles of video to film, making it ideal for beginners and professionals alike.
We’re going to keep things fairly basic and I’ll call out some simple modifications along the way. Let’s begin with perhaps the most obvious piece of equipment required for shooting video - the camera.
The Camera - What you actually need
No camera. No video. It’s that simple. But please don’t take this as your opportunity to go drop $50k on the latest Red V-Raptor XL Cinema camera (it doesn’t even include batteries at this price!). I did an entire video and blog post about why your camera really doesn’t matter, which you can view here: Cool Camera. Nobody Cares.
Okay, so what are we really looking for in a camera? Here is where you get to exercise some creativity as my suggestions will always be to get the most for the least. What do I mean? Start small and get really good at lighting and sound. We’ll get to this in a moment, but a good lighting setup can make even the cheapest cameras look more professional, and if you sweeten that with some crisp audio, your viewers will be none the wiser. At the end of the day, your camera should be able to do the following:
- Shoot in 1080 HD, 4k preferred.
- Track faces with autofocus (especially if you’ll be filming yourself).
There are several other components that will become more important in time, such as the ability to film in log format, have interchangeable lenses, and a 3.5mm microphone, but this is really all that matters for a simple talking head video. Your primary goal here is to capture the clearest image as possible, for the least amount of upfront expense.
The Microphone - Two professional options
Now that we have the capability of filming a high resolution video, we’re going to need to hear it and for that, we’ll need a microphone. As a musician, I’m a bit biased toward the audio side of video production, and will often encourage higher spending in this area. Since this is a talking head video with a single speaker, I’m going to suggest a supercardioid directional microphone, also known as a ‘shotgun’ mic. You can also use a lavalier mic for this setup, and often I recommend using both for redundancy in the event a mic fails while filming.
You can get your hands on a really nice directional shotgun microphone for under $300, but if you’re just starting out and not ready to invest so much, there are some good lavalier mics available on Amazon for much less. If you do choose a shotgun mic, you will likely need to power it with an external source of 48v, known as Phantom Power, and I’ll address this more toward the end.
Additionally, if you’d like to learn more about microphones for video, check out my video called Which Mic is Right for Your Next Video?
The Lights - Which ones and how to set them up
If you asked me to pick one thing that makes professional video stand out from amateur video, it would have to be good lighting. The easiest mistake for beginner videographers is to walk into a room, flip on the light switch, set up their camera and start filming. This overhead lighting creates harsh shadows under the eyes, the color temperature is unnatural, and in the case of old office buildings, fluorescent lights will often flicker on screen.
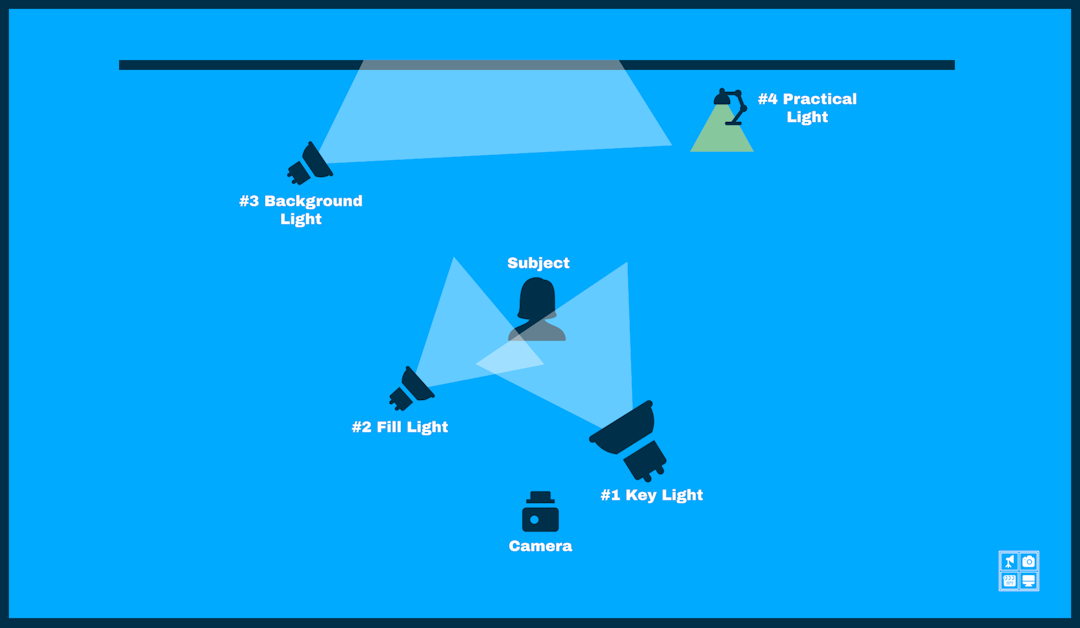
When lighting your subject, your light should be full and smooth. Rather than be positioned directly overhead, your lights will come down closer to eye level, and you’ll use them strategically to separate your subject from the background. Here is a simple, four-light setup that will immediately improve the overall look of your video:
- Key Light - This is your brightest light that sits in front of your subject, but slightly to the right or left of their face.
- Fill Light - This light is smaller, and sits opposite of the key light with the purpose of ‘filling in’ any shadows created by the key light.
- Background Light - If you’re in a room with no windows, or you’re filming at night, you may need to subtly light your background.
- Practical Light - For added depth and dimension, a practical light may be used in the background. This can be a small desk lamp or mini RGB light casting a bit of color into the mix. It’s important to note that this light should be small and not distracting.
If you’re filming outside during the day, you’ll be utilizing natural light and, depending on your filming location, you may not need additional lighting. In some cases, it can be beneficial to use a diffuser to filter out the strength of the sun, or a reflector as a natural ‘fill light,’ but this isn’t always necessary. Be creative and see what looks best in camera!
The Extras - Boring things that nobody talks about
Alright, so we’ve addressed all the big, fun stuff, but it’s important to give attention to the little things that hook it all together. I won’t be addressing a computer here, because I am assuming you already have one if you’re reading this blog online. Sure, you could be reading from your smartphone, but even that can run video editing software if you’re in a pinch. So what other gear is needed at this point? Let’s address three necessities, and one ‘nice-to-have.’
- Audio Interface: In the section on microphones above, I mentioned 48v of Phantom Power required to power your shotgun mic (if you’ve opted for the 3.5mm mic that plugs directly into your camera, you can skip this part, yay!). Most shotgun mics will require an external battery source, and since it’s not directly connected to your camera, you’ll need a device that will record the audio as well. My recommendation is a small field recorder such as the Zoom H4 Essential that comes with two mic inputs, and records audio to a micro SD card. It’s portable and also provides the 48v needed to power your mic!
- Cables: This one is somewhat obvious, but easily overlooked. You will need a XLR cable to connect your microphone to the audio interface. I’m going to suggest something in the 20 foot range, and longer if you’re using a boom pole. While not nearly as exciting as a new piece of tech, having extra mic cables lying around is never a bad thing.
- Stands: Another boring, but necessary piece of gear is a stand (or multiple stands) for your mic and lighting setup. In many cases, a lighting kit will come with collapsable stands, but you’ll want the convenience and flexibility of positioning your lights around a room to create the most professional look. You’ll also need to position the microphone strategically close to your subject, but just out of frame. A boom stand (one that hinges) works great here.
- Tripod: I’m putting this in the ‘nice-to-have’ category because a little creativity can solve this problem for free. Still, a tripod is the best way to protect your camera by providing stability and structure. Also, camera tripods are rather inexpensive these days and they provide a wide range of height adjustment. As I stated in the beginning, I’m a big fan of doing more with less, but if you plan to do video on the regular, it may be wise to invest in a good tripod now.
You Have Everything You Need to Get Filming!
Just like that, you have everything required to create a professional talking head video, and you know how to set it all up! You are one step closer to hitting the red button and shouting, “ACTION” so let’s do a quick recap.
Your HD camera is positioned on its tripod in front of your subject. You’ve positioned your key light, fill light, background light, and practical light appropriately around the room. Your shotgun mic is just out of frame, in front of your subject, and aimed at their upper chest for the best sound quality. It’s also plugged into your audio interface with Phantom Power activated. Can you guess what happens next? That’s right, it’s time to make something amazing!
Discover The 6 Steps to Creating Pro Video Without Pro Gear
Enter your name and email below to receive your free 18-page PDF guide,
"6 Steps to Creating Better Video"
We hate SPAM. We will never sell your information, for any reason.
