Getting Started with Premiere Pro
Oct 14, 2025
Shooting a video is only half the battle. Nobody can enjoy or experience the impact of your message, if your footage never leaves the camera! Knowing that, we’ve got to take the footage and audio from your shoot, back it up to a computer, and begin my personal favorite part of creating video… the edit.
Today, I’m going to share my process for getting started, and while any video editing software will work, I will specifically address some basics with Adobe Premiere Pro. The goal here is to provide clearly defined next steps, so that you know exactly what to do when you’ve finished filming. I’m not going to get into the weeds of editing technique here, but my hope is that by the end of reading this, you will feel more comfortable setting up your project and navigating Premiere Pro. Let’s get the boring stuff out of the way first.
File Management & Import

By the time you’ve wrapped up your video shoot, you will have defined your ideal viewer, scripted out an impacted message, scouted the perfect location, gathered the gear, set it all up, and hit record to capture some high quality footage and audio. You’ve spent more time in pre-production, prepping for the shoot, than you have spent actually making the video! As a result, it can be tempting to pack it all up, hit the couch, and binge the next episode of The Great British Baking Show (what I would give for a Paul Hollywood handshake…). Don’t fall into this trap! The very first thing you should be doing, before anything else – ideally even before packing up your gear – is to offload any recorded date to an external hard drive, or computer.
I even like to take things a step further by creating a digital file system on my computer with the following folders:
- Primary Folder - Titled the name of the video
- Project - This is where Premiere Pro will save my progress
- Footage - Everything from the camera
- Audio - Everything from my audio recording device
- Exports - All rough cuts, final cut, and SRT File go here
- Thumbnail - If needed, it gets its own folder
- Elements - Sometimes called ‘Assets.’ This will hold any graphical elements, such as logos, photos, etc.
Once your folders are in place, and your footage and audio are uploaded to your computer, it’s time to launch your editing software. When using Premiere Pro, the first thing you’ll click on is “New Project” which will open a dialogue box asking where you’d like the project to be saved. Navigate to the Project folder and click ‘Create.’ Premiere will bring you to a new page called “Import Mode,” but I’ve turned this feature off so I can get to the Timeline quicker. Now all you need to do is drag your Footage, Audio, and Element folders (yes, the entire folder!) to the project panel found on the bottom left corner of your project in Premiere and let go. Boom! You’ve just imported your footage, audio, and any graphical elements to Premiere, and because you already had the folders in place, Premiere understood the assignment and created identical bins to house it all while you work. Bonus!
A WORD OF CAUTION: When you import data to Premiere, the program is not actually storing anything. All you’ve done is tell Premiere where to find the real footage/audio/elements. That being said, do not move your folders or change their names once you’ve made it this far or Premiere Pro will not be able to find the information, leaving you with a whole lot of nothing to edit.
Get to Know Your Workspace

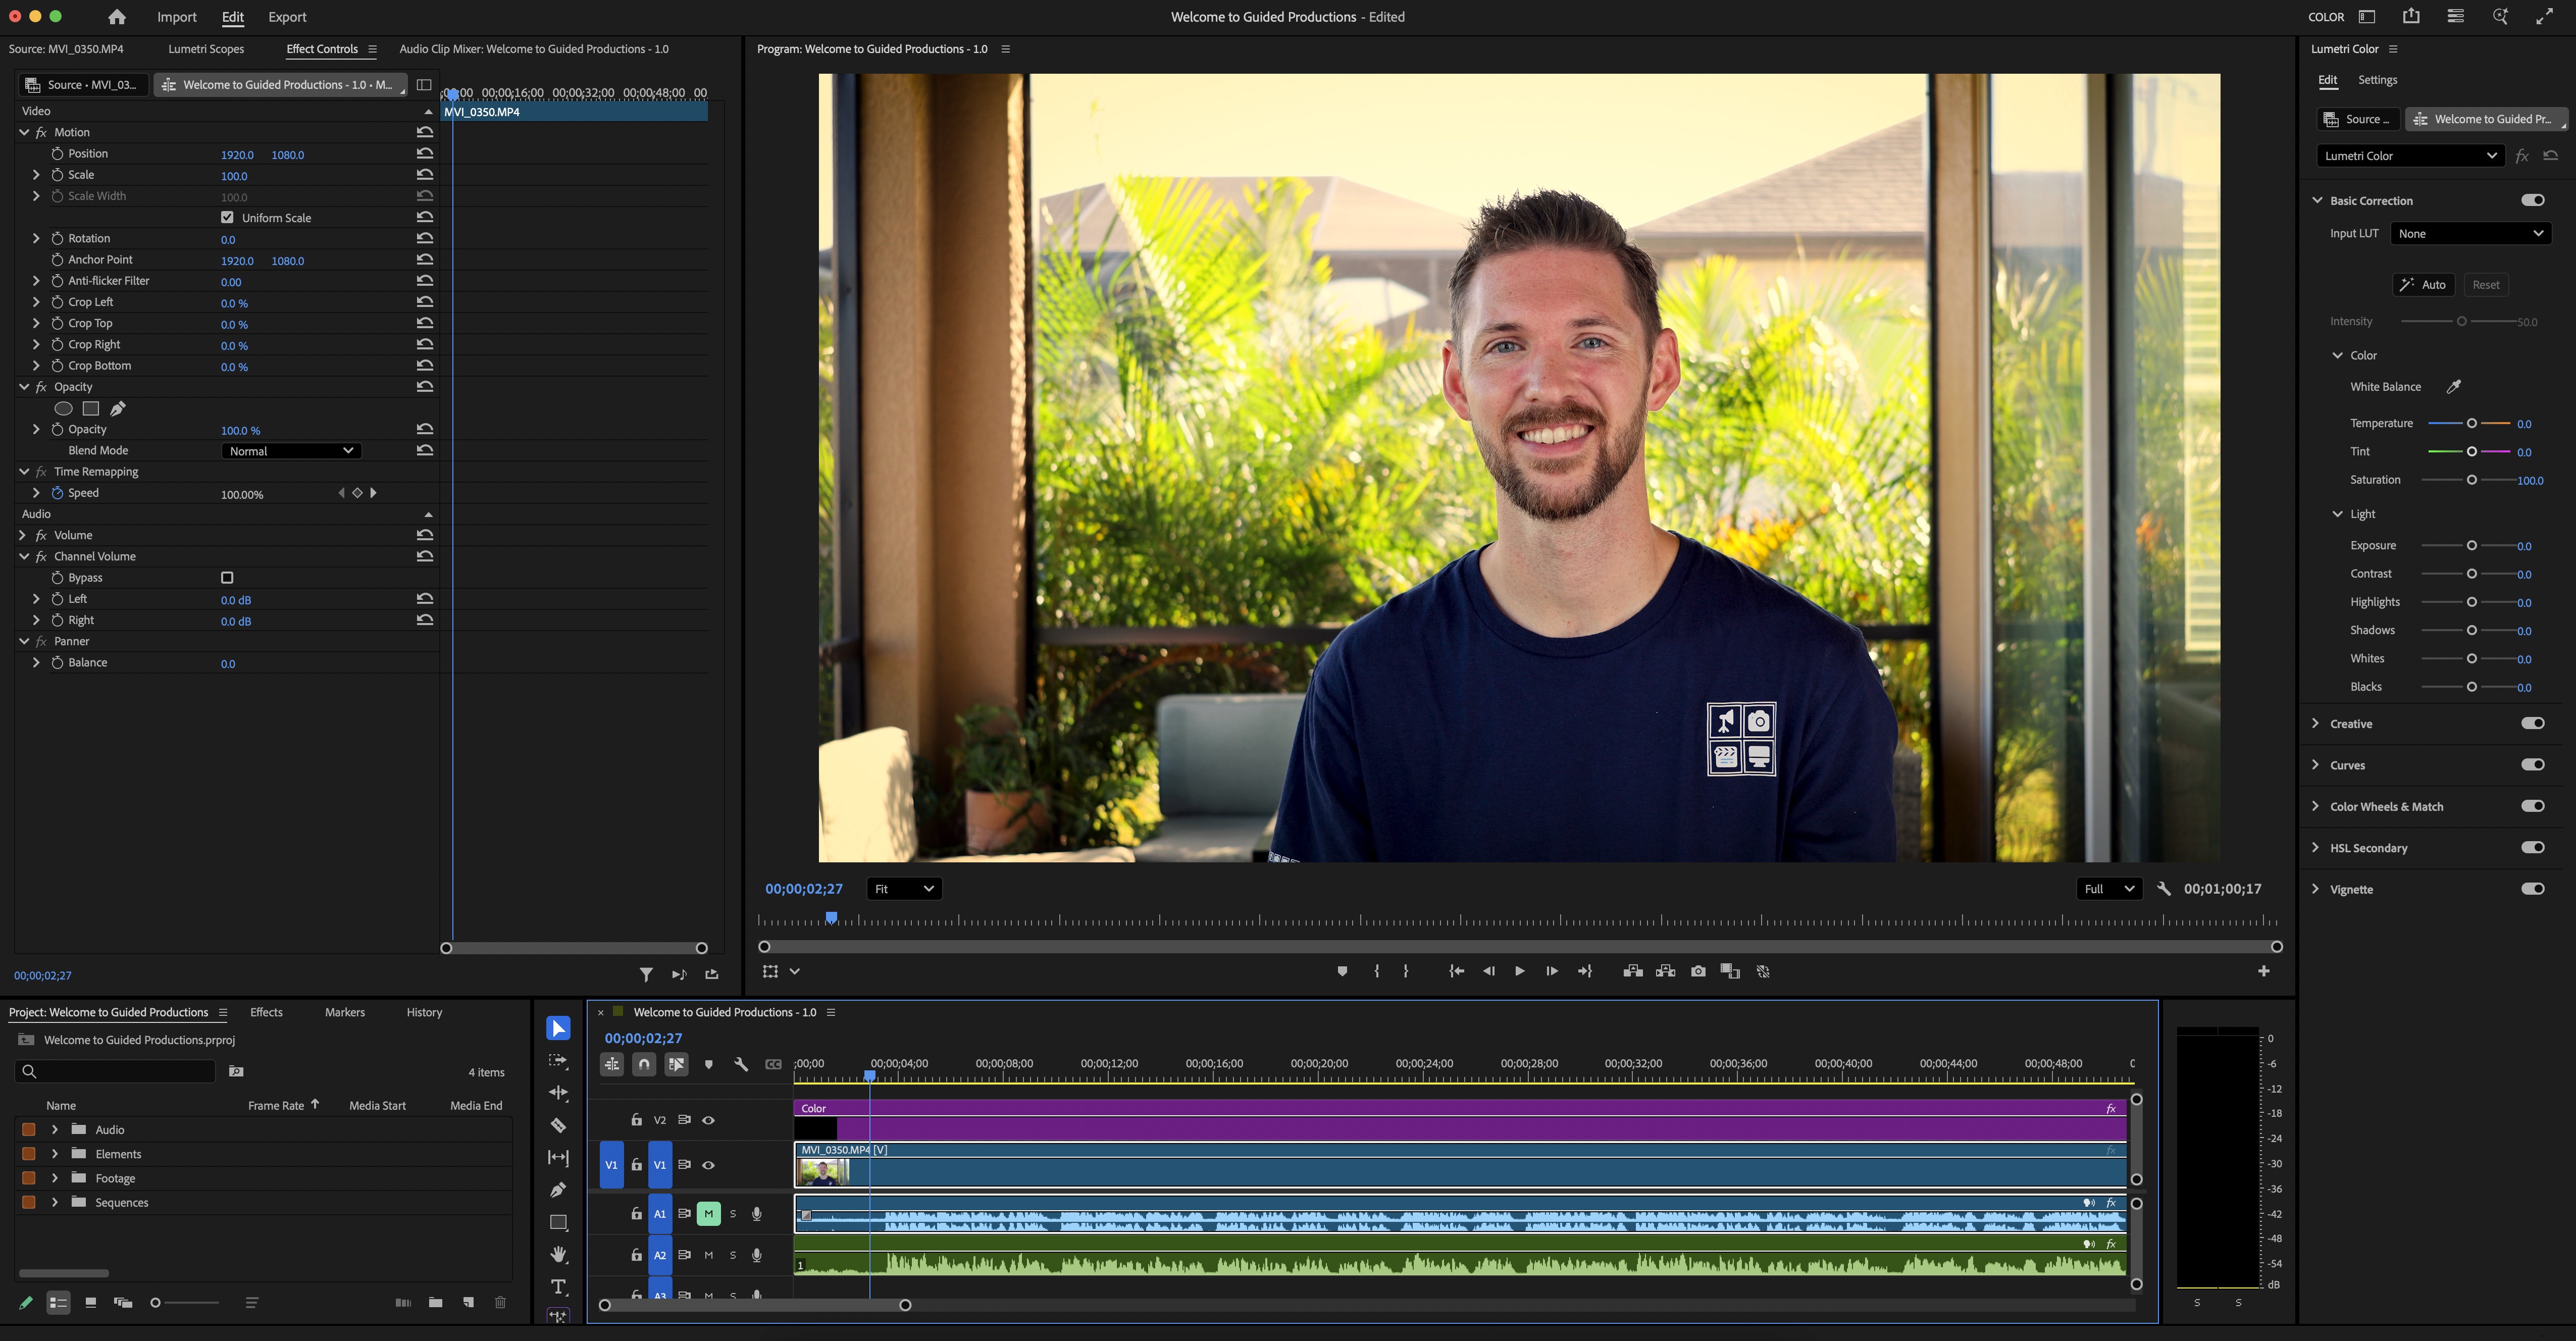
The first thing you may notice about the Editing Workspace in Premiere Pro, is that you essentially have two viewing monitors: A Source Monitor and a Program Monitor. If you double-click your footage from the Project Panel (bottom left corner), a preview will appear in the Source Monitor. This is not a place for editing, but a place to review and cut out only the parts that you need and drag them to your timeline (long, horizontal box along the bottom). Once you do this, you’ll notice two things. The first being that an image has appeared in your Program Monitor, and there is some colorful stuff on the timeline below. What does it all mean?!
Your footage will show up in blue, and if there is any audio linked to it from the camera, it’ll be directly underneath (also in blue). Once you pull in some external audio, that will appear in green. Audio will always appear on the bottom, and video/photos/graphics/text will always appear on top. While there’s plenty more to unpack here, I’ll just call out one last thing: Workspaces.
Premiere Pro allows you to choose a different workspace to better align with each task. For example, if you are cleaning up some audio, you can jump to the Audio Workspace, which reveals additional features built for audio, similarly to what you might see in a Digital Audio Workstation or DAW (think Pro Tools, Ableton, GarageBand, etc). Another example might be the Color Workspace (shown here), which reveals the Lumetri Color Panel on the right for quick adjustments to your clip. These workspaces simply change the functional layout of Premiere, but they do not alter your video.
Effects & Export Window

I hesitate to mention effects this early on in the process, but if you’re anything like me, you may be eager to start clicking around and cutting things up. You’ll need to understand the Effects Panel for things like transitions, animations, green screen editing, and more. How you find the Effects Panel is rather simple – navigate back to where you started in the Project Panel at the bottom left corner of your screen. You should notice another tab that says, “Effects.” That’s it! By selecting that tab, you’ll see a handful of folders that house Adobe’s built-in effects, in addition to a search bar where you can look them up by name. Once you get into an editing rhythm, you’ll have your go-to effects memorized, and you’ll be able to pull them up in no time. As with everything else, you’ll apply the effects by dragging it from the Effects Panel to the clip in the timeline that you want to effect. You can then make further adjustments in the “Effect Controls” up by the Source Monitor. Now you’re editing!
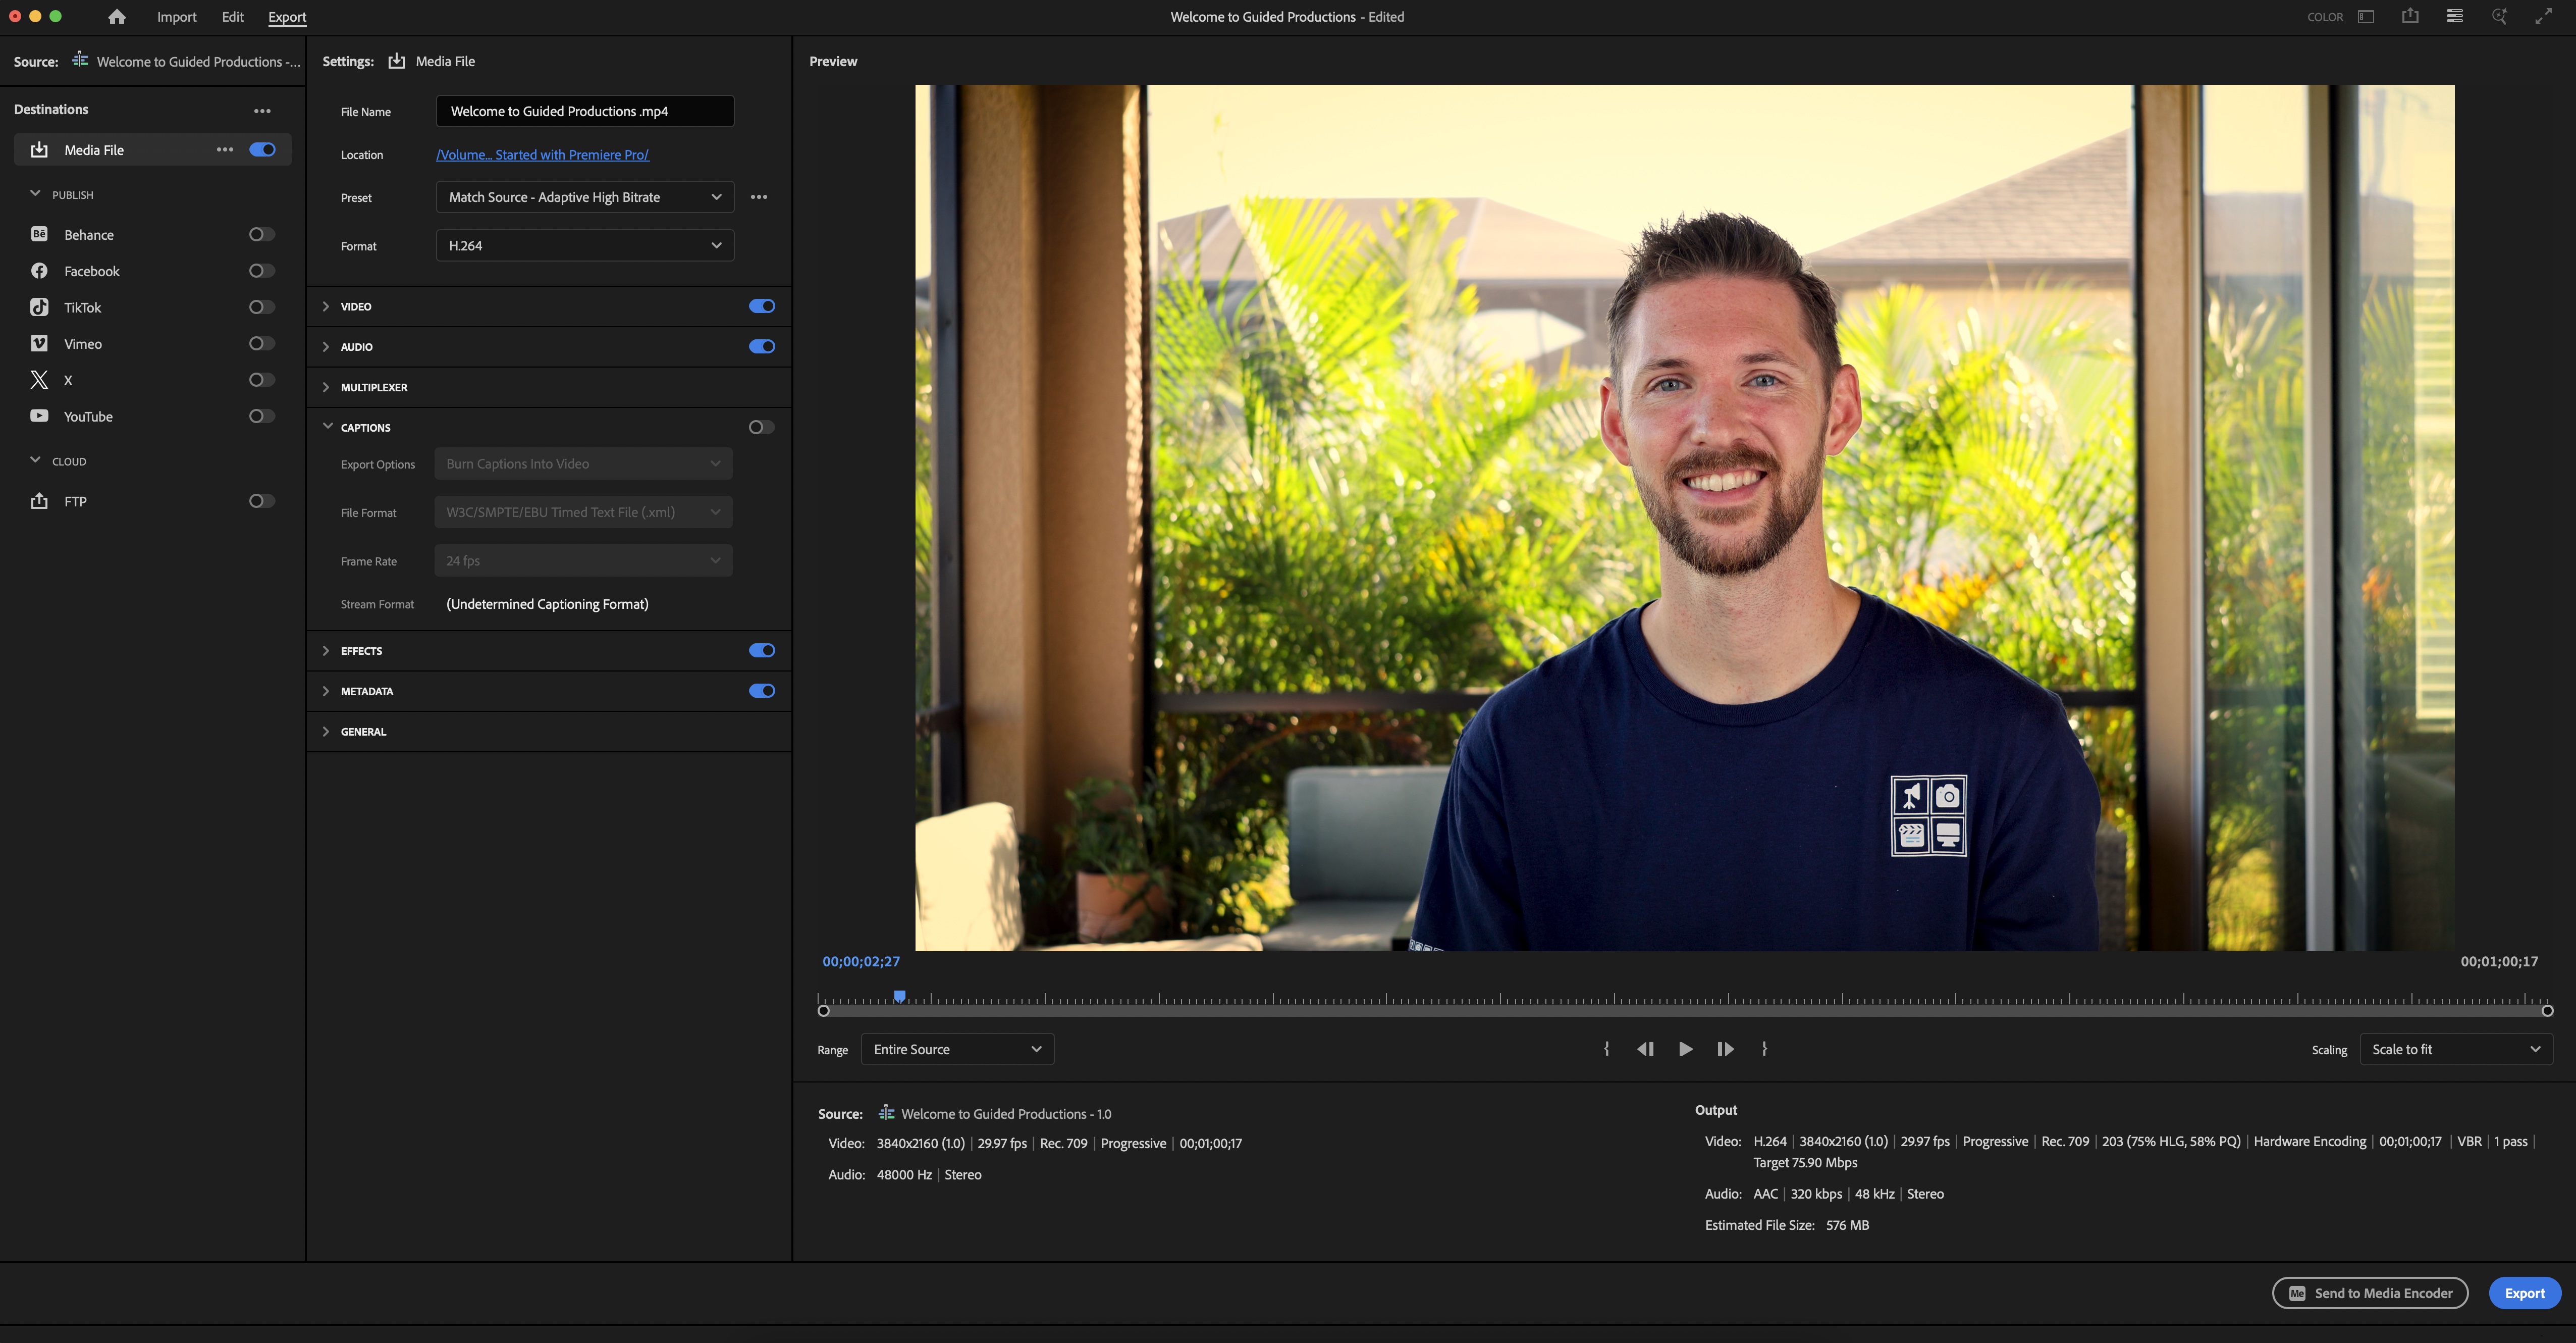
Now, if I hesitated to mention Effects at this stage in the game, it seems silly to talk about exporting, but as you familiarize with the program, it will be helpful to know how to get your video out of it! There are two ways to access the Export Window. The first is the logical path of File > Export > Media. The second removes a couple of clicks. As you look just under the menu bar toward the top left of your screen, you’ll notice it says Edit, and there’s another tab for Export. That’s what you want.
Don’t be overwhelmed! There is a lot going on here, but you’ll only need to worry about a couple of things. You’ll first need to tell Premiere Pro where to save your video. Remember the Exports folder you created in the beginning? Here’s where it comes into play! Next, you’ll need to adjust your video quality. I’ll often choose a lower bitrate for rough cuts and a higher bitrate for final versions. This will help reduce your file sizes and make rough cuts easier to share for review. Once you’re happy with the video quality, you’ll want to look for Captions (if you didn’t create a caption track during the edit, you can skip this part). If you did create a caption track, Premiere Pro will default to having the captions “burned in” to your video. Meaning there will be no way to turn subtitles off. You’ll want to click the dropdown and choose “Create Sidecar File.” With this option, Premiere will export a .SRT file that can then be uploaded to YouTube or your preferred video hosting site that will allow your viewers to toggle subtitles on and off. And finally, it’s time to click “Export” and let Premiere Pro do its thing. To find your completed video, just navigate to your Exports folder where the new video and .SRT file will be saved, and pat yourself on the back for a job well done!
What Are You Waiting For?
As with anything you start for the first time, there will be a learning curve to navigating Premiere Pro, but don’t be discouraged! I will continue to create resources that help in this area, but there are thousands of helpful tricks and tips online already. It really just takes repetition and before long, your muscle memory will kick in and you’ll be cycling through Premiere like a Pro.
Speaking of muscle memory, I think it’s important to note the keyboard shortcuts within Premiere. I won’t call them all out here, but I’ll at least show you how to find the keyboard shortcut map: On Windows, go to Edit > Keyboard Shortcuts. On Mac, go to Premiere Pro > Keyboard Shortcuts. From there, you’ll see a virtual keyboard outlining all of the default shortcuts. You can leave everything as-is, or remap certain keys to better suit your working style. My most commonly used shortcuts for Mac are the Selection Tool (V), the Razor Tool (C), and Ripple Edit (B).
As we wrap up, I think it’s important to note that Adobe rolls out software updates for Premiere Pro on a somewhat regular basis. Everything discussed today is in reference to Adobe Premiere Pro 2025 (version 25.5.0) and is subject to change as time goes on. Don’t wait for an update to get started, though! Get some footage into Premiere Pro and get to clicking. It’s time to create something amazing.
Discover The 6 Steps to Creating Pro Video Without Pro Gear
Enter your name and email below to receive your free 18-page PDF guide,
"6 Steps to Creating Better Video"
We hate SPAM. We will never sell your information, for any reason.

